
On Dec 10, the number is 148465 / 150000 since there were a new server opened, and it will take 10,000 account. Usually in 2 weeks, it will be fulfilled.
1 Create your own account
2 Log into your assigned panel through https://panel.serv00.com/
For me, I am using https://panel13.serv00.com/
3 Panel Dashboard – DevilWEB2.0
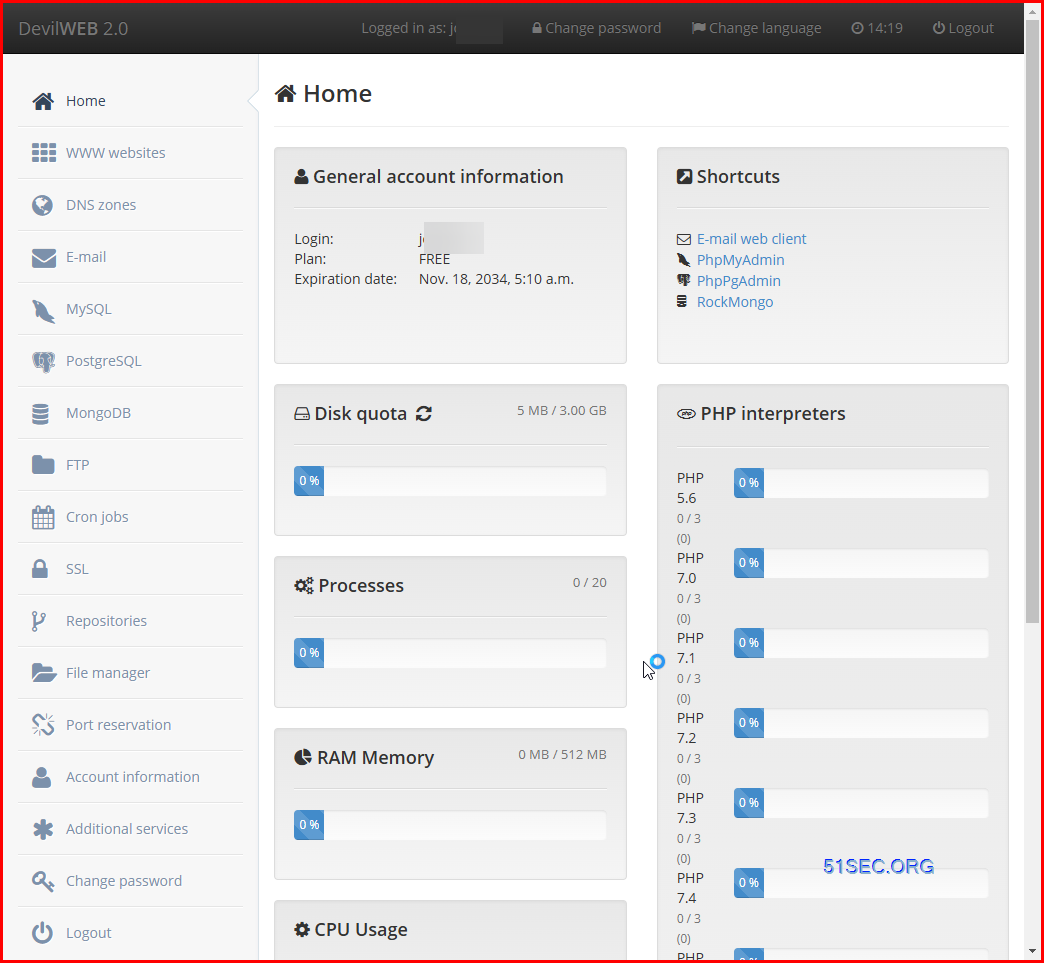
4 Check your Account Info and Server Info
| Plan: | FREE |
| Expiration date: | Nov. 18, 2034, 4:51 a.m. |
Mail servers
| SMTP server: | mail13.serv00.com |
| IMAP server: | mail13.serv00.com |
| POP3 server: | mail13.serv00.com |
Database servers
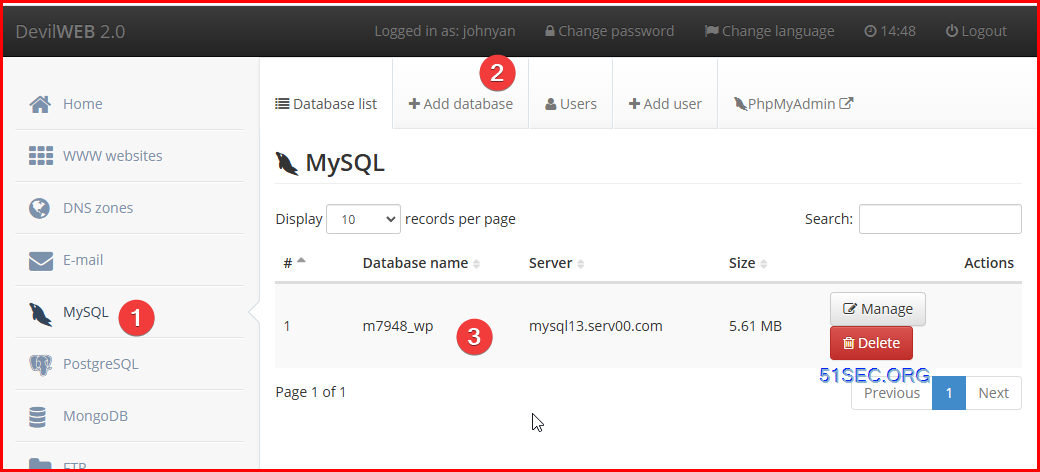
| MySQL server: | mysql13.serv00.com |
| PostgreSQL server: | pgsql13.serv00.com |
| MongoDB server: | mongo13.serv00.com |
DNS servers
| DNS server #1: | dns1.serv00.com |
| DNS server #2: | dns2.serv00.com |
Login with SSH
SSH Login
host: Depending on the allocated server when you registered. For me, there are 12 servers full already, so I got server 13, which is :
user name and account is the one you regestered at serv00.
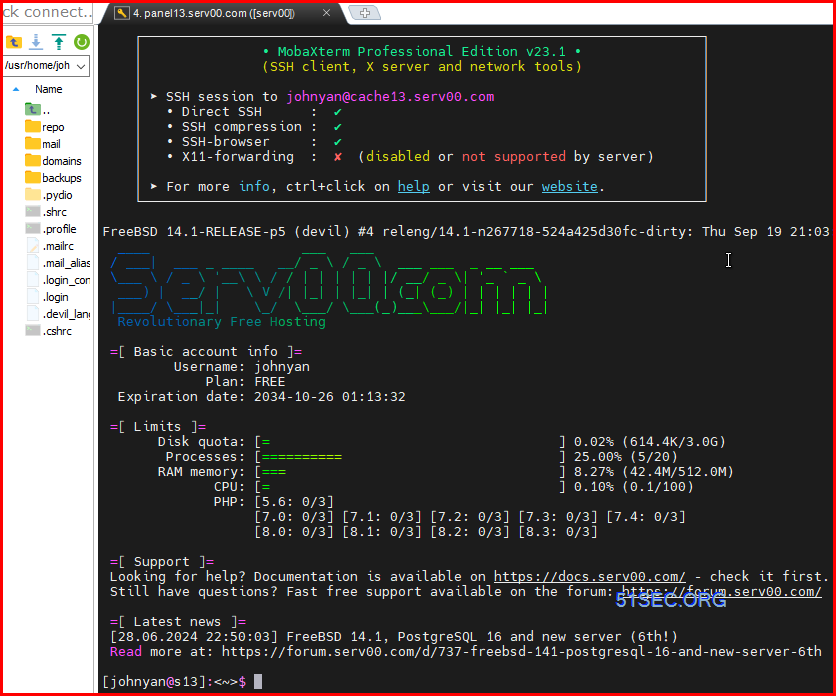
To keep you account alive, you had better to log in once every 90 days.
https://www.serv00.com/tos
    ┌──────────────────────────────────────────────────────────────────────┐
    │               • MobaXterm Professional Edition v23.1 •               │
    │               (SSH client, X server and network tools)               │
    │                                                                      │
    │ ⮞ SSH session to [email protected]                          │
    │   • Direct SSH      :  ✓                                             │
    │   • SSH compression :  ✓                                             │
    │   • SSH-browser     :  ✓                                             │
    │   • X11-forwarding  :  ✗  (disabled or not supported by server)      │
    │                                                                      │
    │ ⮞ For more info, ctrl+click on help or visit our website.            │
    └──────────────────────────────────────────────────────────────────────┘

Last login: Fri Jan 17 14:26:59 2025 from 160.32.192.102
FreeBSD 14.1-RELEASE-p5 (devil) #4 releng/14.1-n267718-524a425d30fc-dirty: Thu Sep 19 21:03:53 CEST 2024
  ____                   ___   ___
 / ___|  ___ _ ____   __/ _ \ / _ \  ___ ___  _ __ ___
 \___ \ / _ \ '__\ \ / / | | | | | |/ __/ _ \| '_ ` _ \
  ___) |  __/ |   \ V /| |_| | |_| | (_| (_) | | | | | |
 |____/ \___|_|    \_/  \___/ \___(_)___\___/|_| |_| |_|
  Revolutionary Free Hosting

 =[ Basic account info ]=
         Username: netsec
             Plan: FREE
  Expiration date: 2035-01-15 17:34:18

 =[ Limits ]=
       Disk quota: [=====================================] 7.15% (219.7M/3.0G)
        Processes: [=====================================] 25.00% (5/20)
       RAM memory: [=====================================] 7.34% (37.6M/512.0M)
              CPU: [=====================================] 3.40% (3.4/100)
              PHP: [5.6: 0/3]
                   [7.0: 0/3] [7.1: 0/3] [7.2: 0/3] [7.3: 0/3] [7.4: 0/3]
                   [8.0: 0/3] [8.1: 0/3] [8.2: 0/3] [8.3: 0/3] [8.4: 0/3]

 =[ Support ]=
 Looking for help? Documentation is available on https://docs.serv00.com/ - check it first.
 Still have questions? Fast free support available on the forum: https://forum.serv00.com/

 =[ Latest news ]=
 [09.01.2025 02:25:15] Server migration - s15.serv00.com
 Read more at: https://forum.serv00.com/d/2251-server-migration-s15serv00com

[netsec@s13]:<~>$
SSH 登录 Serv00,输入以下命令以激活运行许可:
Install WordPress
https://docs.serv00.com/WordPress/
Create a MySQL DB
- Go to
~/domains/DOMAIN/whereDOMAIN (such as jo.serv00.net)is the name of the domain where WordPress will be installed, command:cd ~/domains/DOMAIN/. - Download the installation archive of the latest CMS version:
fetch https://wordpress.org/latest.zip - Delete the
public_htmldirectory, unpack the archive, rename the unpacked directory and remove the unnecessary archive after unpacking:rm -r public_html && unzip latest.zip && mv wordpress public_html && rm latest.zip - Go to the website and continue the classic WordPress installation in your browser. https://jo.serv00.net
Deploy Your Own Apps in Serv00
Enable – Run Your Own Applications
DevilWEB2.0 – Additional services – Run your own applications – Enabled
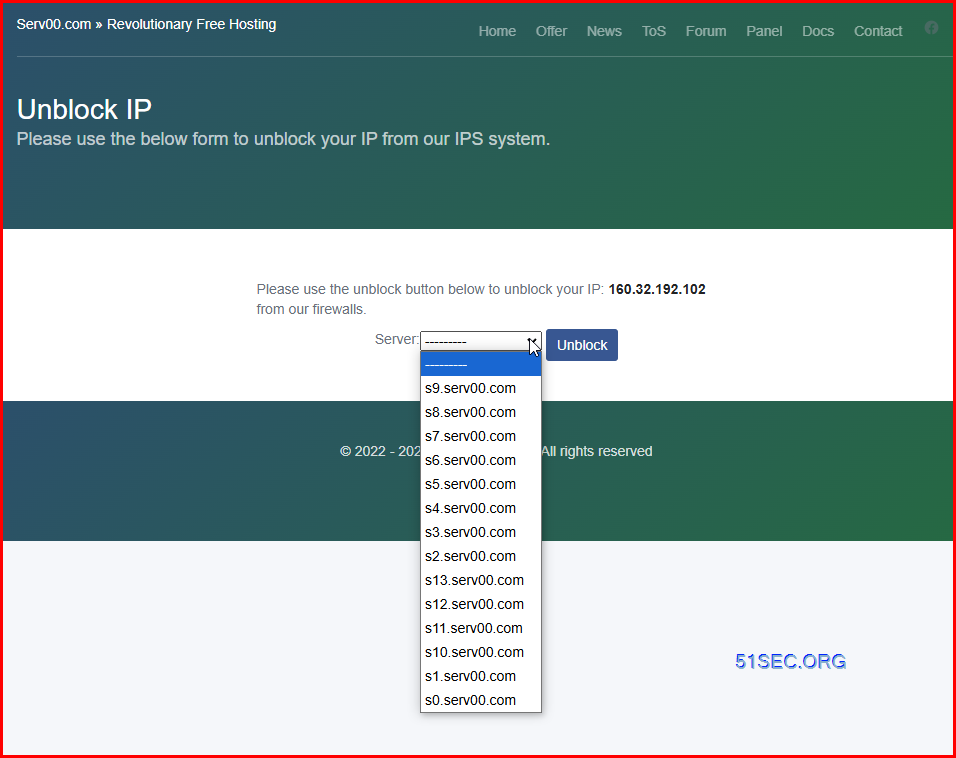
Unblock IP
If for some reasons, your ip got blocked by serv00.com, you can use following page to unblock your ip.
https://www.serv00.com/ip_unban/
Install PM2
bash <(curl -s https://raw.githubusercontent.com/Shadownc/serv00-sh/main/install-pm2.sh)
# or
bash <(curl -s https://raw.githubusercontent.com/k0baya/alist_repl/main/serv00/install-pm2.sh)
PM2 commands list:
- pm2 start ./auto-renew.sh
- pm2 list
- pm2 ls
- pm2 delete auto-renew
- pm2 save
- pm2 resurrect
- pm2 logs
Install Cloudflared
Cloudflared 官方仓库并没有构建 FreeBSD 系统上能够使用的二进制文件,但是同样的,我找到了第三方的构筑。使用第三方构筑的二进制文件,就能愉快的使用隧道了。
关于 Cloudflared 是什么,有什么用,ARGO_TOKEN 如何获取等部分,这里不再赘述,详细可以查看我的关于 CodeSandbox 的文章。
1 Create Cloudflared working folder:
- mkdir -p ~/domains/cloudflared && cd ~/domains/cloudflared
2 Download Cloudflared from the third party’s build:
- wget https://cloudflared.bowring.uk/binaries/cloudflared-freebsd-latest.7z && 7z x cloudflared-freebsd-latest.7z && rm cloudflared-freebsd-latest.7z && mv -f ./temp/* ./cloudflared && rm -rf temp
3 Test first:
- ./cloudflared tunnel –edge-ip-version auto –protocol http2 –heartbeat-interval 10s run –token ARGO_TOKEN
Replace ARGO_TOKEN with your own. After test, ctrl+c to stop the running.
- pm2 start ./cloudflared — tunnel –edge-ip-version auto –protocol http2 –heartbeat-interval 10s run –token ARGO_TOKEN
Get Argo_Token from Cloudflare Zero Trust service page / Networks / Tunnels
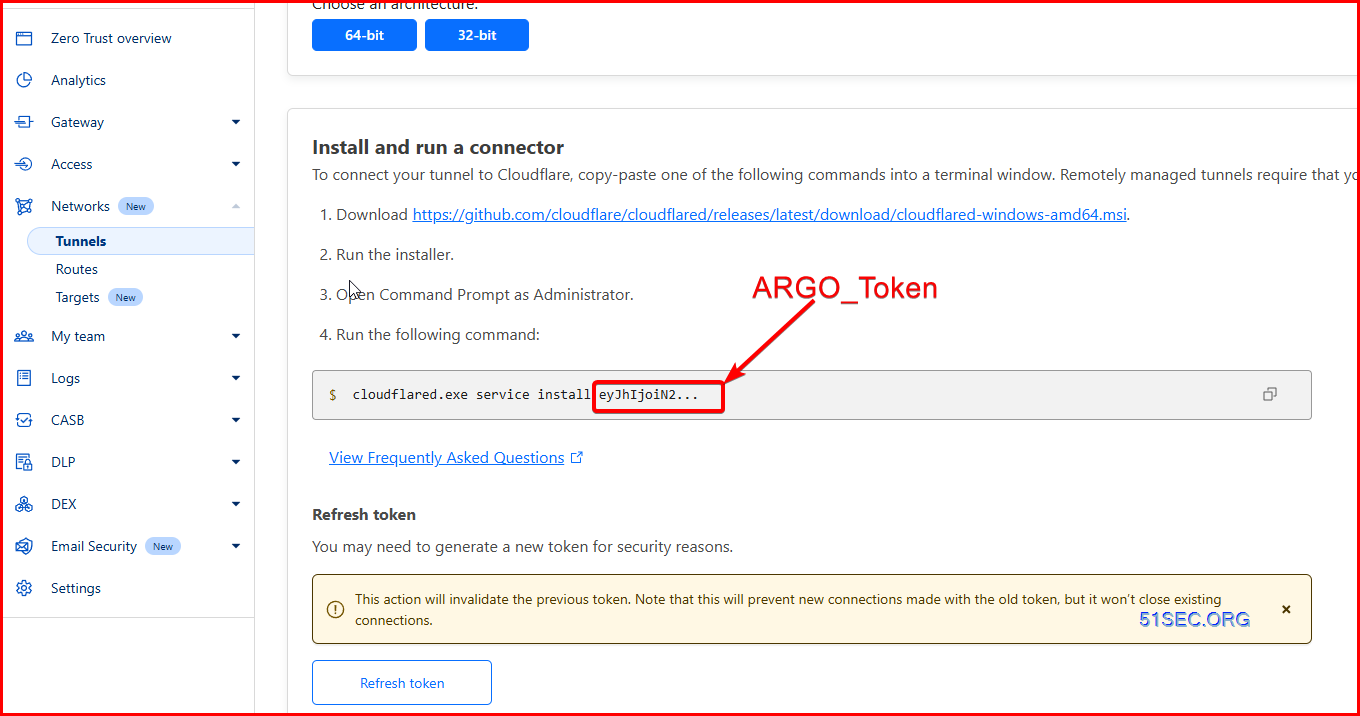
Replace ARGO_TOKEN with the one you found from Cloudflare Zero Trust service page / Networks / Tunnels.
[j@s13]:<~/domains/cloudflared>$ pm2 start ./cloudflared -- tunnel --edge-ip-version auto --protocol http2 --heartbeat-interval 10s run --token eyJhIjoiN2YzNjkyNmRlOTI3ZWQ3NmEwYThhOGYyNWFhZjMxOGMiLCJ0IjoiODQ3YzM3NTctODRhZC00YjExLTliNzAtMmNiZmUwZjgzYmNhIiwicyI6Ik1qTTJZekV5T1RndFkyVXdPQzAwWkRCaExUaGpZbVF0WkRVMk1ETTRNREl3TldSbSJ91

[PM2] Spawning PM2 daemon with pm2_home=/home/jo/.pm2
[PM2] PM2 Successfully daemonized
[PM2] Starting /usr/home/jo/domains/cloudflared/cloudflared in fork_mode (1 instance)
[PM2] Done.
┌────┬────────────────┬─────────────┬─────────┬─────────┬──────────┬────────┬──────┬───────────┬──────────┬──────────┬──────────┬──────────┐
│ id │ name           │ namespace   │ version │ mode    │ pid      │ uptime │ ↺    │ status    │ cpu      │ mem      │ user     │ watching │
├────┼────────────────┼─────────────┼─────────┼─────────┼──────────┼────────┼──────┼───────────┼──────────┼──────────┼──────────┼──────────┤
│ 0  │ cloudflared    │ default     │ N/A     │ fork    │ 86038    │ 3s     │ 0    │ online    │ 600%     │ 26.3mb   │ jo  │ disabled │
└────┴────────────────┴─────────────┴─────────┴─────────┴──────────┴────────┴──────┴───────────┴──────────┴──────────┴──────────┴──────────┘
[jo@s13]:<~/domains/cloudflared>$
You might need to wait a bit to see all outputs.
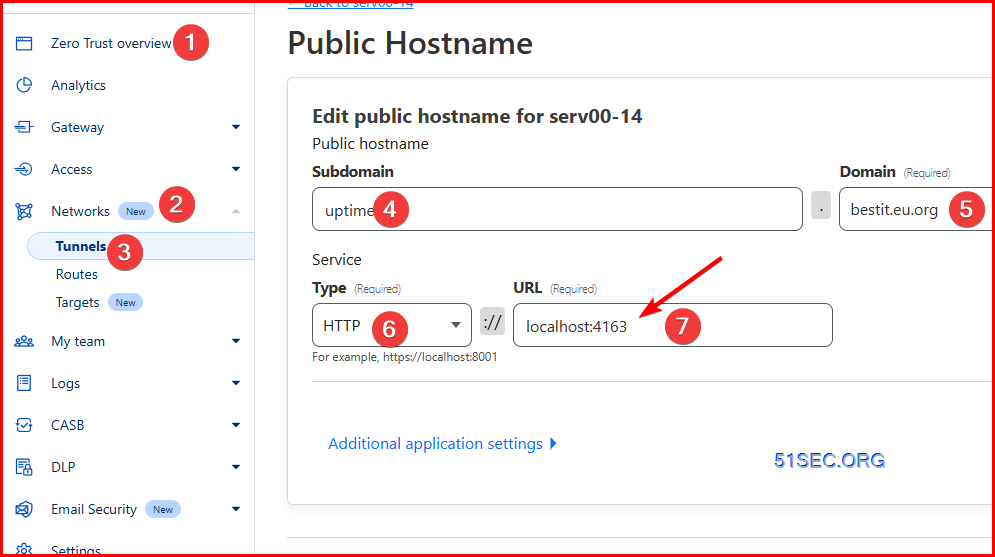
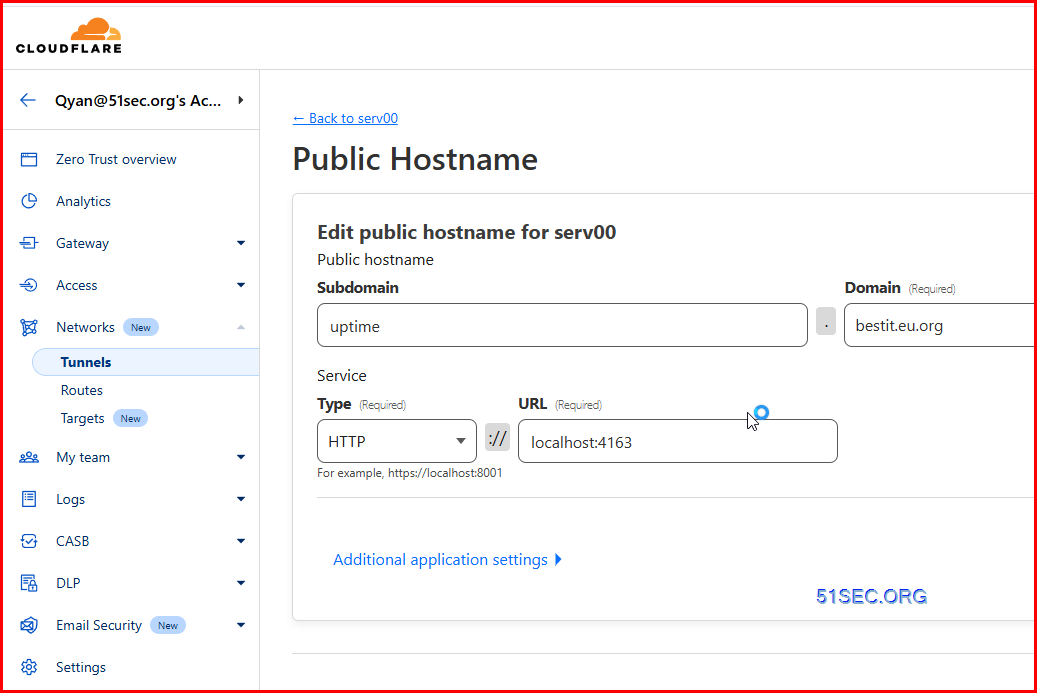
5 Then go to Cloudflare tunnel’s public host name page to set up your own domain to map to your service’s port.
Note: https://saika.us.kg/2024/01/27/serv00_logs/
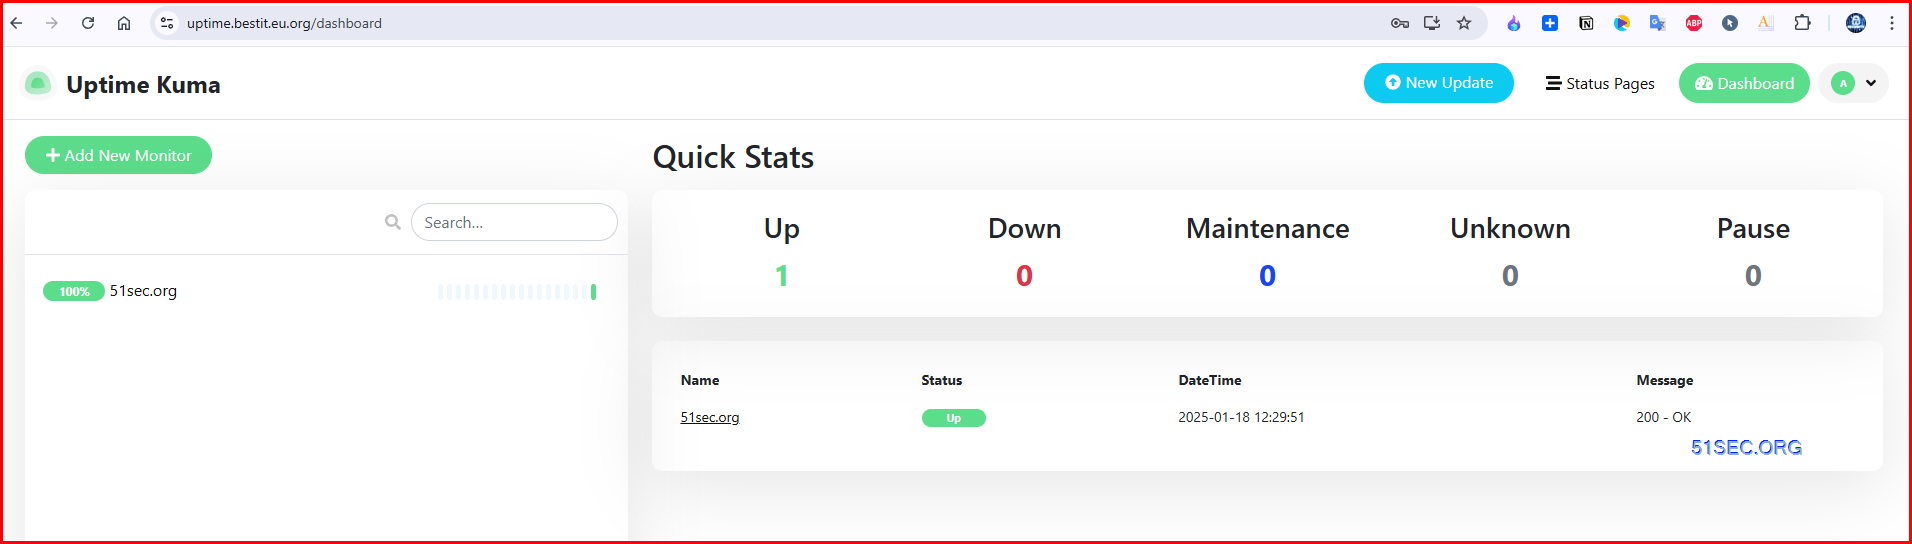
Install Site Monitoring APP – Uptime Kuma
All Commands
cd ~/domains && wget https://github.com/louislam/uptime-kuma/archive/refs/tags/1.22.1.zip && unzip 1.22.1.zip && rm - rf public_html && mv -f uptime-kuma-1.22.1 public_html && rm -f 1.22.1.zip && cd public_html


npm ci --production


wget https://github.com/louislam/uptime-kuma/releases/download/1.22.1/dist.tar.gz && tar -xzvf dist.tar.gz && rm dist.tar.gz


npm install


node server/server.js --port=4163

pm2 start server/server.js --name uptime-kuma -- --port=4163
Demo: https://uptime.bestit.eu.org/status/all
Due to the platform limitations of FreeBSD, version 1.23 has built-in PlayWright and cannot run it, so only version 1.22 can be installed. Remember to release the TCP port in Panel first.
First, release a port in the Panel, and then add a New Website according to the following table:
| Key | Value |
|---|---|
| Domain | xxx.USERNAME.serv00.net(You can also delete the original USERNAME.serv00.net and add it again) |
| Website Type | proxy |
| Proxy Target | localhost |
| Proxy URL | Leave blank |
| Proxy port | The port you plan to use to deploy Uptime-Kuma |
| Use HTTPS | False |
| DNS support | True |
After adding the new site, continue to click Manage SSL certificates above, then click Manage on the right side of the export IP, and then click Add certificate:
| Type | Domain |
|---|---|
| Generate Let’s Encrypted certificate | Keep it consistent with the domain name of the site you just added (if it is the original one USERNAME.serv00.net, you can omit this step) |
Then log in via SSH and enter the domain name directory you just created:
BASH
Set production mode:
Download the dist file:
BASH
Install additional dependencies:
There will be errors during the installation process. Just ignore them. In fact, it will run normally in the end. The built-in Cloudflared reverse proxy cannot be used on the FreeBSD platform, but you can use the above-mentioned external Cloudflared for reverse proxy and use your own domain name.
Test run:
BASH
Remember to replace PORT with the port you released. After confirming that there is no problem with the operation, press
Ctrl+cto stop the operation.
Use pm2 to manage the background operation:
BASH
Remember to replace PORT with the port you released.
If you don’t want your Uptime-Kuma
http://IP:PORTto be accessed by others, you can add the suffix at the end of the execution command--host=127.0.0.1so that it can only be accessed through the domain name of the reverse proxy:BASH
Likewise, you can also use Cloudflared Tunnel to add domain names without choosing to use a proxy.
[jonnetsec@s14]:<~/domains/public_html>$ pm2 start server/server.js –name uptime-kuma — –port=4163
[PM2] Starting /usr/home/jonnetsec/domains/public_html/server/server.js in fork_mode (1 instance)
[PM2] Done.
┌────┬────────────────┬─────────────┬─────────┬─────────┬──────────┬────────┬──────┬───────────┬──────────┬──────────┬──────────┬──────────┐
│ id │ name │ namespace │ version │ mode │ pid │ uptime │ ↺ │ status │ cpu │ mem │ user │ watching │
├────┼────────────────┼─────────────┼─────────┼─────────┼──────────┼────────┼──────┼───────────┼──────────┼──────────┼──────────┼──────────┤
│ 0 │ cloudflared │ default │ N/A │ fork │ 41282 │ 73m │ 0 │ online │ 0% │ 36.3mb │ jon… │ disabled │
│ 3 │ uptime-kuma │ default │ 1.22.1 │ fork │ 86760 │ 0s │ 0 │ online │ 0% │ 46.9mb │ jon… │ disabled │
└────┴────────────────┴─────────────┴─────────┴─────────┴──────────┴────────┴──────┴───────────┴──────────┴──────────┴──────────┴──────────┘
[PM2][WARN] Current process list is not synchronized with saved list. Type ‘pm2 save’ to synchronize.
[jonnetsec@s14]:<~/domains/public_html>$ pm2 save
[PM2] Saving current process list…
[PM2] Successfully saved in /home/jonnetsec/.pm2/dump.pm2
[jonnetsec@s14]:<~/domains/public_html>$
[Note] You might need to run following commands to restore the services managed by PM2 and check logs.
——————————Following method is not working anymore —–
——————————it copied here just for a reference. —–
Clone the Uptime Kuma project
Once connected to the server, go into domainsthe directory and clone the Uptime Kuma GitHub repository:
- cd ~/domains
- git clone https://github.com/louislam/uptime-kuma.git
Install dependencies and run Uptime Kuma
Enter the cloned project directory and run the following commands to install the required dependencies and perform preliminary settings:
- cd uptime-kuma
- npm run setup
Modify the configuration file
Modify ecosystem.config.js the file according to the actual situation and set the correct port number. The following is a sample configuration:
module.exports = {
apps: [{
name: “uptime-kuma”,
script: “./server/server.js”,
args: “–port=11010”,
env: {
“PLAYWRIGHT_BROWSERS_PATH”: “/nonexistent”
}
}]
};
Start the service
Finally, start the Uptime Kuma service using pm2:
- pm2 start ./ecosystem.config.js
Through the above steps, you have successfully set up the Uptime Kuma monitoring service on Serv00. You can access your monitoring page through the set port number and start real-time monitoring of your website.
Notes:
- https://linux.do/t/topic/168835
- https://blog.agexf.com/2024/06/30/up-serv00
Your Own Domain Mailbox with Serv00 Hosting
使用自己的域名
- 登录
serv00面板 这里用的S13的 面板地址就是:https://panel13.serv00.com/
- 点击
DNS zones新增一个(Add new zone)

- 要到你的域名托管处添加A记录解析 推荐托管在
Cloudflare
- 返回
Zone list点击你添加的域名右侧操作按钮的Edit红框内的需要在CloudflareDNS解析添加

- 在
Cloudflare添加

- 面板点击
E-mail添加一个邮箱

- 返回
Domain list就可以看到域名出现在列表了 点击Details设置一下存储大小 注意不要给太大 因为serv00只有3G储存

- 前置工作 添加邮箱的时候 控制台会有一个
/add的请求 找到它并且记录token

- 修改脚本中对应值 直接在控制台运行脚本
|
|
上一步保存的 |
|
|
你的域名 |
|
|
你是S几就填几 |
|
|
生成的邮箱的密码 |
|
|
本次执行生成邮箱的数量 |
const csrfToken = '';
const domain = '';
const number = 13;
const password = 'your1@PASSWORD';
const maxEmails = 10;


const characters = 'abcdefghijklmnopqrstuvwxyz0123456789';


function generateRandomPrefix(length = 5) {
  let prefix = '';
  for (let i = 0; i < length; i++) {
    const randomIndex = Math.floor(Math.random() * characters.length);
    prefix += characters[randomIndex];
  }
  return prefix;
}


async function addMailbox(prefix, password) {
  const email = `${prefix}@${domain}`;
  const body = `csrfmiddlewaretoken=${csrfToken}&email=${email}&id_email-placeholder-1=${prefix}&password1=${password}&password2=${password}`;

  const response = await fetch(`https://panel${number}.serv00.com/mail/details/add_mailbox/${domain}`, {
    method: "POST",
    headers: {
      "Content-Type": "application/x-www-form-urlencoded",
    },
    body: body,
    credentials: "include"
  });

  if (response.ok) {
    console.log(`邮箱 ${email} 添加成功`);
  } else {
    console.error(`邮箱 ${email} 添加失败: ${response.status} ${await response.text()}`);
  }
}


async function batchAdd(password, maxEmails) {
  const usedPrefixes = new Set();

  for (let i = 0; i < maxEmails; i++) {
    let prefix;
    do {
      prefix = generateRandomPrefix();
    } while (usedPrefixes.has(prefix));

    usedPrefixes.add(prefix);
    await addMailbox(prefix, password);
    await new Promise(resolve => setTimeout(resolve, 1000));
  }
}


batchAdd(password, maxEmails);
Note: https://blog.lmyself.top/article/122ee568-45a2-802a-a9ea-c2bf6e5d1c23
IP Quality Check in FreeBSD
https://github.com/spiritLHLS/ecs
IP质量检测,含15家数据库查询,含DNS黑名单查询
含 IPV4 和 IPV6 检测,含ASN和地址查询
含邮件端口检测
- bash <(wget -qO- bash.spiritlhl.net/ecs-ipcheck)
Auto Login to Renew Serv00 Every Month
可以使用自身 SSH 自身的方式进行自动续期,操作如下:
1 进入一个自己喜欢的路径,使用 cat 命令新建 auto-renew.sh 脚本:
cat > auto-renew.sh << EOF
#!/bin/bash
sshpass -p ‘密码’ ssh -o StrictHostKeyChecking=no -o UserKnownHostsFile=/dev/null -tt 用户名@地址 “exit” &
EOF
记得把其中的密码、用户名、ssh的地址修改为你自己的。
2 给 auto-renew.sh添加可执行权限:
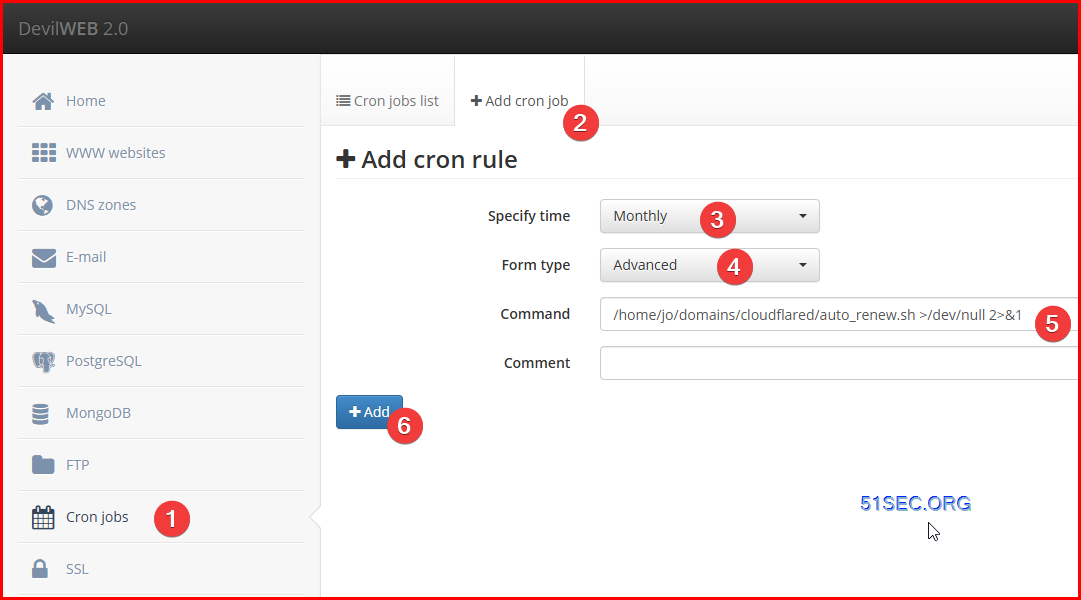
3 再去 Panel 中找到 Cron jobs 选项卡,使用 Add cron job 功能添加任务,Specify time 选择 Monthly,Form type 选择 Advanced。Command 写 auto_renew.sh 脚本文件的绝对路径,如 /home/username/auto_renew.sh >/dev/null 2>&1 即可。
这样就会每隔一个月自动执行一次SSH连接,自己SSH自己进行续期。
Video
YouTube: Get a free serv00 account and create wordpress site:
Install Uptime Kuma:
 – 51 Security")
![[5 Mins Docker] Deploy a free, simple and safe honeypot with Own Domain – HFISH – 51 Security](https://i0.wp.com/i.51sec.org/202309/96435237_1481507445353308_3640914368901677056_n.png?w=1200&resize=1200,0&ssl=1 "[5 Mins Docker] Deploy a free, simple and safe honeypot with Own Domain – HFISH – 51 Security")

![[5 Mins Docker] Install Open Source System and Network Monitoring Application – Nagios Core – 51 Security](https://i1.wp.com/res.cloudinary.com/glide/image/fetch/https%3A%2F%2Fi.ytimg.com%2Fvi%2FMEuUze37tVk%2Fmaxresdefault.jpg?w=1200&resize=1200,0&ssl=1 "[5 Mins Docker] Install Open Source System and Network Monitoring Application – Nagios Core – 51 Security")

